|
||
|
Tinkering |
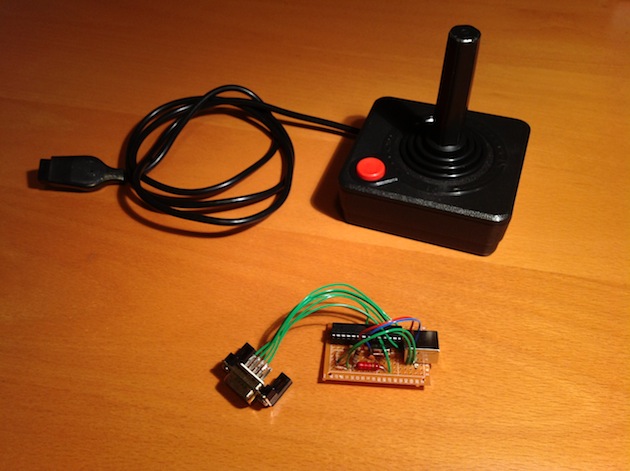
Adapting an Atari joystick to USBPopular home computers from the eighties of the last century are now implemented as emulators for modern operating systems. Presumably these emulators are mostly used to play games. For the machine that is my favorite - the Commodore 64 - there are thousands of titles that can be legally or illegally downloaded from various repositories in the form of disk or tape images. Back in the day, these games were more often than not supposed to be played using a digital joystick. In emulators the function of such a controller (i.e. joystick direction and the fire button) is normally represented by user-assignable keys. However, the ability to use an authentic joystick would contribute greatly to a satisfying retro experience. Using a microcontroller and a few other components it is possible to attach a joystick to a USB port and have it work as a HID device that will produce pressed and released keys in accordance with the settings of an emulator.
The schematic above shows the components necessary for my Atari joystick to USB converter. The state of the joystick switches (up, down, left, right, and fire button) is continuously sampled by the ATMEL 328p microcontroller using its digital inputs (with the internal pull-up resistors activated). The software running on the microcontroller then translates the joystick state to a predetermined key (or a combination of keys, when for example the joystick is pushed in a certain direction and the fire button is pressed simultaneously) that is output on the USB port as a 'key pressed' event. When the joystick state changes (when direction is changed) that event will be cancelled by sending a corresponding 'key released' event on the USB port. For simplicity the keys sent by the microcontroller are hard-coded in the software. In the current version, the arrow keys of a numeric keypad represent the joystick directions, and the '5' key on the same represents the fire button. This is done to reduce the chance of interfering with the normal use of a keyboard in an emulator. Of course, the emulator has to be configured to use these keys as joystick input. This is quite simple to do in the well-known Commodore emulator VICE for instance. Needless to say, the choice of keys can be changed in the microcontroller software if necessary.
The software was originally written as a sketch for an Arduino Uno board. When prototyping was finished, the Uno's ATMEL 328P-PU microcontroller chip was removed from the Uno and placed on a smaller experimenting board with only the necessary components to run the chip and provide USB device connectivity. A modified version of the vusb-for-arduino library was used to provide 'key pressed' and 'key released' functionality. The sketch and the updated version of UsbKeyboard.h can be downloaded using the links below. Atari2USB sketch for Arduino (Originally written 2013/01/19)
|